
우리과 홈페이지에 생각보다 취업 공고가 많이 올라온다.
근데 나도 그렇고 다들 거기 들어가서 보기 귀찮아한다. 아닌가?
그래서 슬랙 봇을 만들어 공지를 크롤링 해와서 보여주는 봇이 있음 좋겠다 란 생각을 하게 되었다.
Node js 공부 겸 만들어보려고 한다.
오늘 개발을 시작했고, 평소처럼 javascript를 쓰려다 그냥 typescript를 써보기로 했다.
서버 프레임워크는 Koa vs Express 중 고민했는데 Express 가 자료는 많았지만 난 그냥 Koa를 쓰려고 한다.
왜냐면 졸업작품 조금 했다고 Koa에 익숙해졌다.
별로 크게 다른건 없다.
1. App 생성
새 HQ에 오신 것을 환영합니다.
Slack은 여러분의 팀과 소통할 새로운 방법입니다. 이메일보다 빠르고, 더 조직적이며, 훨씬 안전합니다.
slack.com
먼저 이 곳에서 create app을 하면 된다.
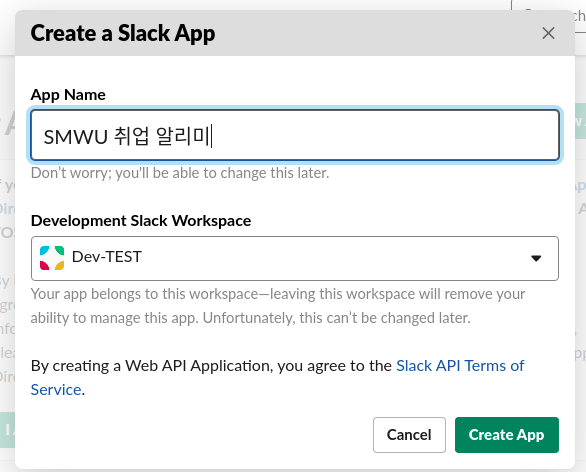
App name을 정하고, 개발용 workspace를 골라준다.
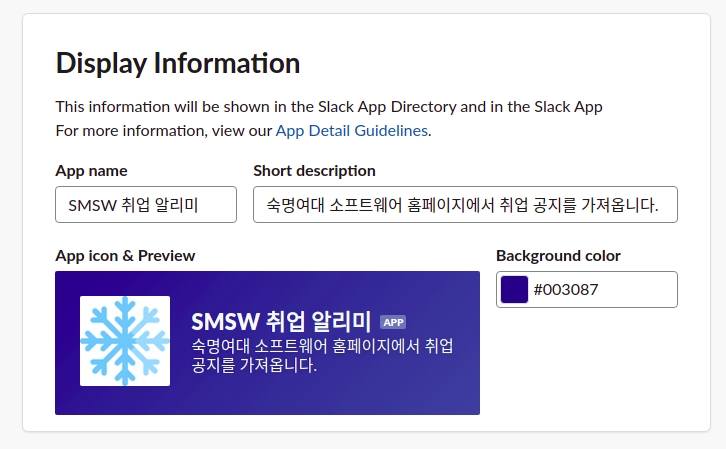
display information은 자신이 보고 예쁘게 바꿔주면 된다.
학교 공식 색인 pantone 어쩌구의 색상코드로 했다.
2. typescript 설정
나는 ubuntu 18.04.5 에서 개발하고 있다.
그래서 윈도우 쓰시는 분들은 조금 다를거다.
project 폴더로 이동한다.
1. yarn init	//그냥 엔터만 계속 누른다

2. package 설치
  "dependencies": {
    "@slack/events-api": "^3.0.0",
    "@slack/web-api": "^6.2.0-rc.0",
    "koa": "^2.13.1",
    "koa-bodyparser": "^4.3.0",
    "koa-router": "^10.0.0"
  },
  "devDependencies": {
    "@types/koa": "^2.13.1",
    "@types/koa-bodyparser": "^4.3.0",
    "@types/koa-router": "^7.4.2",
    "nodemon": "^2.0.7",
    "ts-node": "^9.1.1",
    "typescript": "^4.2.4"
  },

  위 dependencies는
  yarn add koa 이런 식으로 설치

  아래 devDependencies는
  yarn add -D nodemon 이런 식으로 설치

3. package.json scripts
	"scripts": {
    	"start:dev": "nodemon --watch 'src/**/*' -e ts --exec ts-node ./src/index.ts"
  	}
    nodemon 을 사용해 서버 코드 변경시 알아서 재실행 시키도록 한다.
    이제 yarn start:dev 명령어로 실행가능하다.
4. tsc --init
	//tfconfig.json 설정
    {
  		"compilerOptions": {
    		"target": "es5",
    		"module": "commonjs",
    		"resolveJsonModule": true,
    		"strict": true,
    		"esModuleInterop": true,
    		"skipLibCheck": true,
    		"forceConsistentCasingInFileNames": true,
    		"noImplicitAny": true,
    		"outDir": "./dist",
    		"sourceMap": true
  		},
  		"include": [
   	 		"./src/**/*"
  		]
	}
3. 서버 코드 작성 + Slack 추가 설정
이제 본격적으로 서버를 여는 코드를 작성해 봅시다.
src 폴더를 만들고 내부에 index.ts 파일을 만듭시다.
import Koa from 'koa';
import Router from 'koa-router';
import bodyParser from 'koa-bodyparser';

const api = require('./api');
const app = new Koa();
const router = new Router();
const port: number = 3000;

app.use(bodyParser());

router.use('/api', api.routes());
app.use(router.routes()).use(router.allowedMethods());

app.listen(port, ()=> {
    console.log(`Koa server is listening on port ${port}`);
});
로컬 개발용 포트는 3000으로 했다.
라우트를 모듈화 시켜서 api라는 디렉터리에 넣었다.
src/api/index.ts
import { WebClient } from '@slack/web-api';
import Router from 'koa-router';
import CONFIG from '../../config/bot.json';

const token = CONFIG.BOT_USER_OAUTH_ACCESS_TOKEN;

const api = new Router();
const web = new WebClient(token);

api.post('/slack/events', (ctx) => {
    const body = ctx.request.body;
    const event = body.event;

    if(body.type === 'event_callback'){
        //메세지 이벤트
        if(event.text === '가져와'){
            console.log(`수신 channel:${event.channel}, user: ${event.user}`);
            web.chat.postMessage({
                channel: event.channel,
                text: '가져올게요'
            }).then(result => {
                console.log('메세지 발신 : ' + result.ts);
            });
            ctx.status = 200;
        }
    } else if(body.type === 'url_verification'){
        //url 검증
        console.log('url verification');
        ctx.body = body.challenge;
    } else {
        ctx.status = 200;
    }
});

module.exports = api;
token은 좀 이따 설명
api/slack/events 엔드포인트에서 이벤트를 받을건데, ctx.request.body.type이 두가지다.
하나는 event_callback, 나머지 하나는 url_verification
url_verification을 보시면 ctx.body (응답 body)에 ctx.request.body.challenge를 그대로 넣어준다.
그 이유는

슬랙 api사이트에서 사이드바 -> event subscriptions 로 가셔서 enable events를 on 하시면 알게 된다.

이러한 이유에서 url검증을 위해 Post로 challenge 파라미터가 오면 응답을 해줘야 슬랙에서 검증을 통과시킨다.

request URL에 슬랙 앱을 배포시킬 서버 주소를 넣으면 되는데 현재 테스트 용이니 저는 ngrok를 이용해
잠깐 얻은 주소로 테스트했다.
주소 뒤에 우리의 엔드포인트인 /api/slack/events를 넣어준다.
그리고 확인해보면 제대로 됐다면 초록색 Verified가 뜬다.
여기까지 됐다면 연결 완료
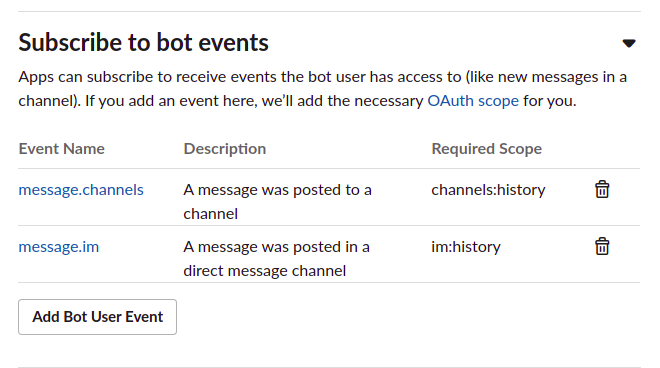
바로 아래에 Subscribe to bot events에 다음과 같이 추가해준다.
Add Bot User Event를 눌러서 검색하시면 된다.
그리고 사이드바에서 OAuth & Permissions 코너로 이동한다.
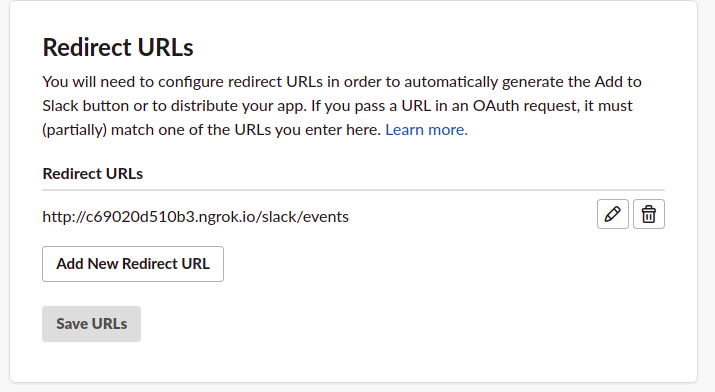
이건 그냥 똑같이 작성했다. 아까 엔드포인트 주소로

Scopes -> Bot Token Scopes 에서 Add an OAuth Scope버튼을 누르고 chat:write를 검색해 추가해준다.
우리 bot이 메세지를 보내야하니까
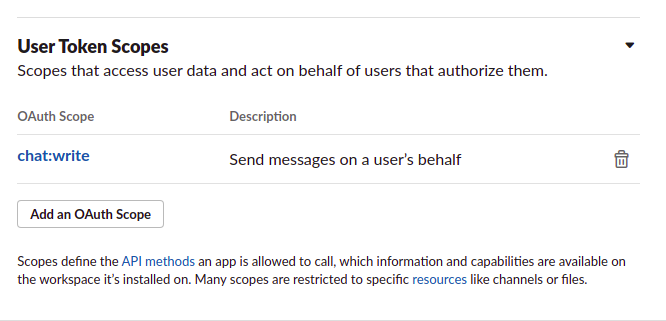
하단에 User Token Scopes에도 마찬가지로 추가해준다.

다시 Basic Information 을 돌아와서 Add features and functionality 토글을 눌러보면
Event Subscriptions 와 Permissions가 초록 불이고 아마 Bots는 불이 안들어와있을거다. 난 그랬다.
저거 3개가 다 초록불이어야 install 이 가능하다.
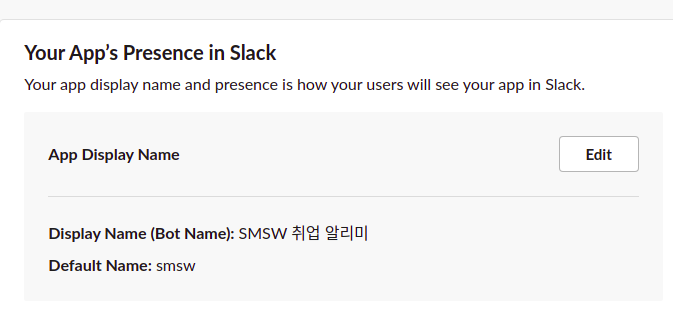
만약 초록불이 아니라면 Bots를 누르고 들어와서 이곳에서 Edit을 눌러주고 Display Name 이랑 Default Name을 설정해주면 된다.
위 모든 변경 사항 후에 우 하단에 Save를 꼭 해주자.
이제 Basic Information에서 Install your app을 눌러준다.
그럼 우리 개발용 슬랙에 앱이 추가된다.
사이드 바에서 다시 OAuth & Permissions 코너로 이동한다.

이런식으로 Token이 생성된걸 볼 수 있다.
여기서 Bot User OAuth Token을 복사해서 우리 코드의 src/config/Bot.json 에 넣어준다.
{
	"BOT_USER_OAUTH_ACCESS_TOKEN": "xoxb-~~~~"
}
import CONFIG from '../../config/bot.json';
const token = CONFIG.BOT_USER_OAUTH_ACCESS_TOKEN;
const api = new Router();
const web = new WebClient(token);아까 src/api/index.ts에 쓴 코드가 이걸 가져오는 코드였다.
@salck/web-api 패키지를 통해 메시지를 보내고 받을거라 이렇게 token을 파라미터로 보내 사용하면 된다.
4. 채널에 앱 추가 후 테스트

채널에서 i 아이콘을 누르고 더보기를 눌러 앱추가를 한다.
우리 앱을 검색해서 추가하면 된다.

짜잔
if(body.type === 'event_callback'){
        //메세지 이벤트
        if(event.text === '가져와'){
            console.log(`수신 channel:${event.channel}, user: ${event.user}`);
            web.chat.postMessage({
                channel: event.channel,
                text: '가져올게요'
            }).then(result => {
                console.log('메세지 발신 : ' + result.ts);
            });
            ctx.status = 200;
        }
    }
요 코드를 자세히 살펴 보면
body.type == event_callback일때
event.text => 사용자가 보낸 메세지라서 event.text == '가져와' 일때
web.chat.postMessage함수에서 어떤 채널에 어떤 text 를 보낼지 설정해줬다.
이제 가져와라는 메세지를 보내보자.

이렇게 반응이온다.
이상으로 Node.js + Koa + Typescript로 슬랙 Bot만들기 초기 설정과 간단한 메시지 테스트를 마치겠다.
'DEV > Node.js' 카테고리의 다른 글
| [CI/CD] AWS CodeDeploy, CodePipeline 으로 node.js, ec2, git 배포 자동화하기 (4) | 2021.12.16 |
|---|---|
| [Node.js] Express, TypeScript, MongoDB 회원가입 (1) (3) | 2021.06.18 |
| Node.js , express, mongoDB, typescript 초기 설정 (0) | 2021.05.26 |
| Node js + Express + Socket.io 로 1대 1 채팅 구현하기 (1) (4) | 2021.03.14 |
| React, Mongoose(MongoDB), Node js 게시판 검색 구현 (2) | 2021.03.13 |